How to hit the super high draw, like Rory did on 15 and 17.

We watched greatness at Augusta National and the shots we'll remember are those high draw shots Rory made on 15 and 17. The one one 15 was especially beautiful.
Let's talk about how to hit these high draws just like Rory so we can be our own heroes on the weekend rounds with the crew.
Most of us know that the set up of the draw has the club face facing the target and we're slightly closed with our bodies. The draw starts out to the right and curves back to the left (for a right handed golfer). But... let's really get into HOW to hit the draw and WHY the ball actually curves from the right to the left.
Here is what you will learn in this article:
- Understand the physics behind a high draw shot
- Learn the proper setup and swing adjustments
- How to practice with progressive drills
Step 1: Understanding the High Draw
A high draw requires:
- Club face that's slightly closed to the path but open to the target
- In-to-out swing path
Okay... we've heard this before about the club face and the path, but why. What's going on scientifically? Let's dive deeper into the golf physics behind these two key elements of the high draw shot:
Club Face That's Slightly Closed to the Path but Open to the Target
This relationship between club face, path, and target is foundational to creating a draw with height. Here's the detailed science:
The club face position at impact primarily determines the initial starting direction of the ball (about 85% influence). The club path influences the curvature (about 15% influence on starting direction, but major influence on curve).
For a high draw:
- The club face needs to be pointing slightly right of your target at impact (open to target) - typically 1-3° open to target
- But simultaneously, the face needs to be slightly closed relative to the path you're swinging on (typically 2-4° closed to path)
This creates the "gear effect" where:
- The ball initially launches right of target (because the face is open to target)
- But imparts draw spin due to the face being closed to path
- The slightly negative attack angle combined with these conditions creates the higher launch
At a super zoomed in level, when the slightly closed club face contacts the ball, it creates compression asymmetry across the ball's surface. This asymmetry generates sidespin (draw spin) as the ball decompresses off the face. The ball actually deforms slightly differently on the toe side versus the heel side during this microsecond of impact. This causes the ball to spin on an angle.

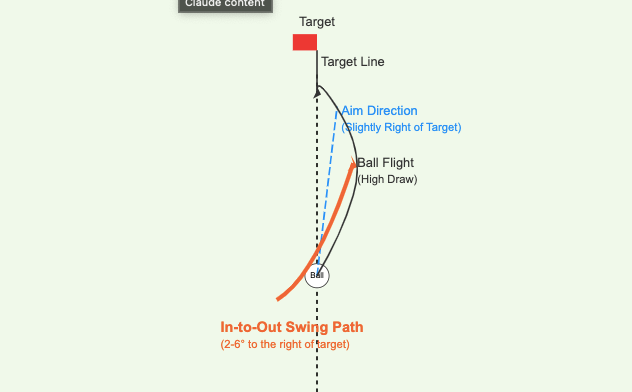
In-to-Out Swing Path
The in-to-out swing path is crucial for creating the proper environment for a draw. Here's the science of the swing path:
In an in-to-out path, the club is moving from inside the target line toward outside the target line at impact. The optimal path for a high draw is typically 2-6° in-to-out relative to your target line.
This happens because:
- During the transition from backswing to downswing, your lower body initiates a weight shift and rotation toward the target
- This creates a "shallow" approach to the ball, with the club approaching from behind you rather than over the top
- The club effectively moves on a path that's pointing right of your target at impact
Step 2: Setup Adjustments
- Ball Position
- Position the ball slightly forward in your stance (toward target). This allows the club to hit the ball later in the swing arc allowing you to get more side spin on the ball.
- For irons: the ball is closer to the center or just forward of center (for right-handed golfers)
- For driver: off your left heel or slightly inside
- Stance and Alignment
- Aim your feet and shoulders slightly right of target (2-5° right)
- Set your shoulders relatively level (not excessively tilted)
- Grip Adjustment
- Strengthen your grip slightly. This allows the face of the club to finish slightly closed of your target.
- See 2-3 knuckles on your left hand at address
- Right hand more underneath the club
Step 3: Swing Adjustments
- Backswing
- Make a full shoulder turn
- Allow your arms to swing more around your body
- Keep your trail elbow closer to your side
- Maintain good width and depth in your backswing
- Downswing
- Start the downswing with your lower body
- Drop your arms slightly from the inside
- Maintain the spine angle established at address
- Feel like you're swinging to right field (or the right side of your target)
- Impact and Release
- Maintain a slightly closed club face to path. This should happen because of your slightly stronger grip.
- Release the club naturally through impact
- Feel your right forearm rotating over your left through impact
- Focus on hitting the bottom half of the golf ball to add height to your shot.
Step 4: Practice Drills
1. Alignment Drill
- Setup: Place alignment sticks on the ground - one set parallel to your feet (5° right of target) and another pointing directly at your target
- Execution: Address the ball with your body aligned to the right-aiming sticks while your clubface is pointed more toward the target stick
- Focus Point: Feel the relationship between your body alignment and clubface orientation
- Repetitions: Make 10-15 practice swings, then hit 10 balls maintaining this setup
2. Path Drill
- Setup: Place a headcover or towel 6-8 inches outside your trail foot (right foot for right-handed golfers)
- Execution: Make swings ensuring your club path avoids hitting the object on the downswing
- Focus Point: Feel how your lower body initiates the downswing while your arms drop to the inside
- Repetitions: 10 practice swings without a ball, then 10 shots with a ball
3. Gate Drill
- Setup: Create a "gate" using two tees or alignment sticks positioned about 6 inches apart, angled to encourage an in-to-out path
- Place the first marker a few inches inside your target line and slightly behind the ball
- Place the second marker a few inches outside your target line and slightly ahead of the ball
- Execution: Swing the club through this gate without touching either marker
- Focus Point: Visualize the proper path from inside to outside through impact
- Repetitions: Start with half-swings until confident, then progress to full swings
4. Progressive Ball Flight Drill
- Setup: Select a target on the range with plenty of space to the right
- Execution:
- Stage 1: Hit 5 balls with a slight draw (minimal curve)
- Stage 2: Hit 5 balls with a medium draw (moderate curve)
- Stage 3: Hit 5 balls with a high draw (combining height and curve)
- Focus Point: Make only one adjustment at a time between stages
- For more height: Add more dynamic loft at impact
- For more curve: Strengthen grip slightly or increase in-to-out path
- Repetitions: Complete all three stages, then repeat the sequence
High Draw Challenge
Before concluding your practice session, test your mastery with this progressive challenge:
Level 1: The 30-Yard Zone
Set up three alignment sticks or clubs on the range:
- One at 30 yards directly on your target line
- One at 30 yards, 5 yards right of target line
- One at 30 yards, 5 yards left of target line
Your goal: Hit 5 consecutive shots that start right of the center stick and curve back to land between the center and left sticks.
Level 2: Elevation Control
Place a towel or target at 150 yards (or adjust to your comfortable 7-iron distance):
- Hit 5 high draws that carry the entire distance with minimal roll
- The ball should land softly, showing a steeper descent angle than your normal shot
Level 3: The Full Package
Find a target on the range with a visible hazard or obstacle on the right side:
- Imagine a scenario where you need to hit over the obstacle but still curve the ball back to the target
- Successfully execute 3 consecutive high draws that carry the obstacle and land within 10 yards of your target
Keep track of your progress with each challenge. When you can successfully complete Level 3 in three consecutive practice sessions, you've developed a reliable high draw that can be a valuable weapon in your arsenal.
Step 5: Troubleshooting
- Ball Going Too High Without Draw
- Check grip (may be too weak)
- Ensure club face is slightly closed to path
- Verify you're swinging in-to-out
- Ball Drawing Too Much (Hook)
- Reduce grip strength slightly
- Open stance more to target
- Focus on body rotation through impact
- Ball Starting Too Far Right
- Check that club face isn't too open at address
- Work on better face control in transition
- Ensure proper release timing
Thank You For Reading This Far!
The high draw is one of golf's most satisfying shots to master. It combines power, control, and finesse in a way that can transform your approach to challenging holes. As you incorporate this shot into your game, you'll find new lines off the tee, better angles into greens, and more confidence when facing intimidating course layouts.
Trust your practice, commit to the shot, and enjoy the beautiful flight of a well-executed high draw. The process of mastering this shot will enhance your overall understanding of ball flight and swing mechanics.
Happy practicing, and may your high draws find their targets!